Monday 27 May 2013

hiding the sharepoint list calculated columns using jquery


Reference Url

http://www.infinitedreamers.co.uk/sharepoint-2007-hide-calculated-fields/

SharePoint 2007 – Hide calculated fields in display form

The following steps describe how to hide calculated columns when viewing an item in a SharePoint 2007 list using SharePoint Designer 2007 and jQuery.
  1. Download the latest version of jQuery.
  2. Upload the file to a document library in your SharePoint site.
  3. Open your site with Microsoft Office SharePoint Designer (a free download).
  4. Open ‘default.master’ – found under _catalogs/masterpage (Master Page Gallery).
  5. Add <script type=”text/javascript” src=”url to your/jquery-1.6.2.min.js”></script> just above the </HEAD> tag. SharePoint 2007 default.master changes
  6. Save and publish this file.
  7. Open ‘DispForm.aspx’ for your list – found under Lists/your list name/
  8. Add the following script at the bottom of the ‘PlaceHolderMain’ content zone:
    <script type="text/javascript"> $(document).ready(function(){ $("[id=SPFieldCalculated]").parent("tr").css("display","none"); }); </script>
    SharePoint 2007 DispForm.aspx Changes
  9. Save this file.
I stumbled upon this technique when a customer did not want the 8 calculated columns used as filtering criteria in a view visible when viewing the item.

Treeview for a document library using sharepoint designer


ReferenceUrl
http://yetanothersharepointblog.wordpress.com/2012/08/28/adding-a-treeview-to-a-document-library-using-sptreeview-and-sphierarchicaldatasource/

Steps:


To add a treeview to a document library view, folow these steps:
1. Broswe to the view you want to add the treeview to.
2. Edit the page in Sharepoint Designer — then click Advanced Mode.
3. Add a table to PlaceHolderMain with one row and two columns (if you cut and paste this, make sure all the double-quotes get paster properly!):
<table style=”width: 100%”>
   <tr valign=”top”>
    <td width=”20%”>
    </td>
    <td>
    </td>
   </tr>
</table>
4. Move the existing Webpart Zone (the one that contains the view) and all its content to the second <td> you just added.
5. Add the following to the first <td>  you just added(the one whose width is 20%). Again make sure all the double-quotes get paster properly!
<SharePoint:SPHierarchyDataSourceControl id=”doclibDataSource” runat=”server” RootListId=”ff460d94-a778-426e-988f-487c654550de”
RootWebId=”6bb72437-8077-4b8c-b2ee-bf389ab08273″ ShowFolderChildren=”true” EnableViewState=”false”>
</SharePoint:SPHierarchyDataSourceControl>
<SharePoint:SPTreeView ID=”doclibtreeview” runat=”server” DataSourceID=”doclibDataSource” EnableViewState=”false” ExpandDepth=”2″
SelectedNodeStyle-CssClass=”ms-tvselected”>
</SharePoint:SPTreeView>
6. Change the RootListId attribute of the SPHierarchyDataSourceControl to whatever is in the ListID Attribute of the  XsltListViewWebPart in the second <TD>.

7 .  Change the RootWebId attribute of the SPHierarchyDataSourceControl to the WebID of the Web the list is in (I used sharepoint manager to get the WebID)

8.Getting the webid using below script

<script type="text/javascript">
ExecuteOrDelayUntilScriptLoaded(PageLoad, "sp.js");
function PageLoad() {
debugger;
this.ctx = SP.ClientContext.get_current();
this.web = ctx.get_web();
this.ctx.load(this.web);
ctx.executeQueryAsync(Function.createDelegate(this, this.onQuerySucceeded), Function.createDelegate(this, this.onQueryFailed));
}
function onQuerySucceeded() {
debugger;
alert(this.web.get_id());
}
function onQueryFailed(sender, args) {
alert('Request failed. ' + args.get_message() + '\n' + args.get_stackTrace());
}
</script>


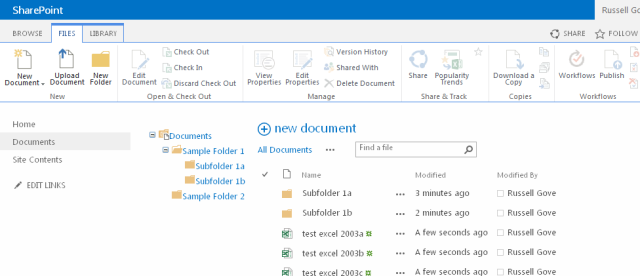
I have added this also to an office 365 account(although its tricky to get the web id). Here’s how it looks there:
and in SharePoint 2013 on-prem:


Hideing the sharepoint list fields using javascript

ReferenceUrl:
http://sharepointsherpa.com/2008/08/26/sharepoint-2007-hiding-fields-on-newformaspx-and-editformaspx-the-easy-way/


Steps
  1. Open SharePoint Designer and navigate to the site that contains the list or document library you wish to customize.
  2. Expand the folder named “Forms” under the desired list or document library.  You should see about seven .aspx pages (AllItems.aspx, EditForm.aspx, NewForm.aspx, etc)
  3. Open the NewForm.aspx page and switch to the “code” view to edit the HTML of the page.
  4. Paste the JavaScript code immediately below the the following HTML tag <asp:Content ContentPlaceHolderId=”PlaceHolderMain” runat=”server”>  This will add the JavaScript to the HTML inside the content placeholder tag.  Note: be sure to include the entire script below, including the <script and </script> tags.
  5. Modify the “hidefields()” section of the JavaScript code to refer to each SharePoint list field name to hide.  For example, the code sample below will hide the SharePoint fields named Title, Document Link, and PublishDate    Notice that you do not need to worry about internal field names or field types like other JavaScript techniques, you simply need to know the name of the field.
  6. Save the changes.  Select “Yes” when prompted to “…customize the page from the site definition…”
  7. Test the form

<script language="javascript" type="text/javascript">

_spBodyOnLoadFunctionNames.push("hideFields");

function findacontrol(FieldName) {

   var arr = document.getElementsByTagName("!");
   // get all comments
   for (var i=0;i < arr.length; i++ )
   {
      // now match the field name
      if (arr[i].innerHTML.indexOf(FieldName) > 0)
      {         return arr[i];      }
   }
}

function hideFields() {

   var control = findacontrol("Title");
   control.parentNode.parentNode.style.display="none";
   control = findacontrol("Document Link");
   control.parentNode.parentNode.style.display="none";
   control = findacontrol("PublishDate");
   control.parentNode.parentNode.style.display="none";

}
</script>